DIY: How to Create a Bead Bowl
 A few months ago our content was featured on the Parade.com website! With the winter months rolling in soon, we thought it would be a good time to reintroduce the craft directly here on SahmReviews.com.
If your family is anything like ours, holidays and birthday lists are filled with wishes for the latest trendy product. Even when we have decided not to indulge in the latest crafty doohickey, inevitably the kids end up with it as a gift from someone else. Our playroom shelves are filled with kits for making lip gloss, painting ceramics, creating jewelry of all kinds as well as bands and beads for crafting.
On occasion, the girls will sit down and create some kind of friendship bracelet or necklace or even some random craft. Unfortunately, at the rate we’re going, we will have enough stuff to make high school graduation gifts for all their friends.
Case in point, beads. The girls have been using the flat squares provided with the kit to make all kinds of pixel art. Some are very creative but all have been confined to the square starter base. Until Miss M needed to create five items for class economics and we discovered a cool use for a few handfuls of those beads!

How to Create a Bead Bowl
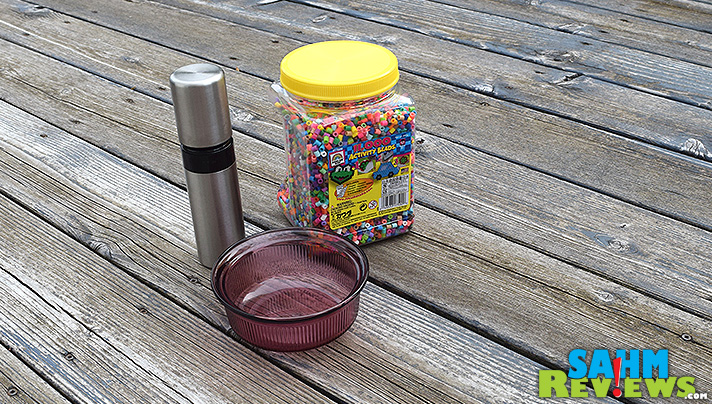
Supplies:
Heat safe bowl
Cooking spray
Cookie sheet
Beads, beads and more beads
1) Find a heat-safe bowl. We had some old Pyrex dishes that were the perfect size for a decorative bowl.
2) Spray the inside of the bowl with cooking spray. This helps with removal of the bowl after the beads melt.
3) Place the bowl on the cookie sheet.
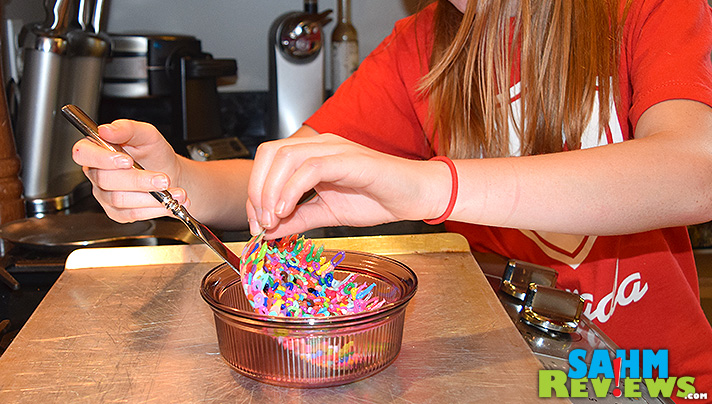
4) Line the bowl with beads.
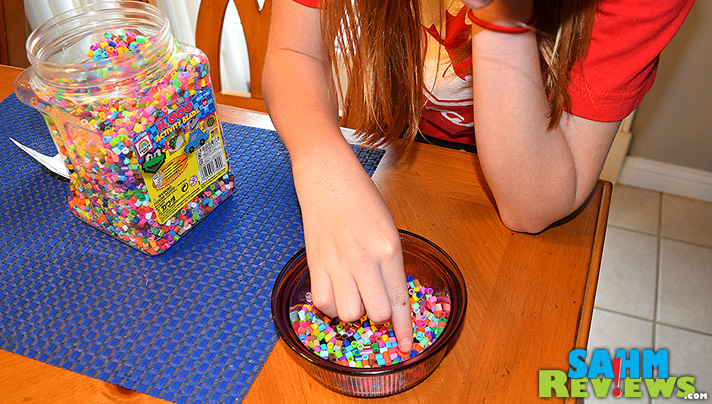
5) Flatten the beads into a single layer as close to each other as possible. Doubling them up will require you to adjust the cooking time and I didn’t want to take a chance of burning any of them by cooking too long. The direction of the beads doesn’t matter.

6) Add additional beads to the sides to get them as high as you can up the edges. They slump a little when they melt. For subsequent bowls, we’ll make sure we make the edges much higher.
7) Turn the oven to 375.
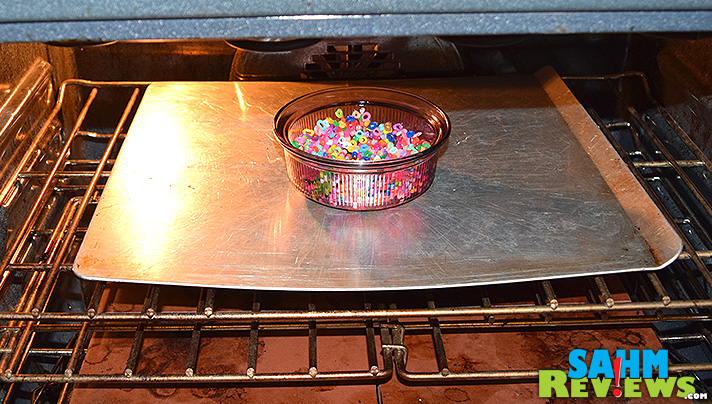
8) Place the cookie sheet with bowl in the oven immediately. It will allow the beads to slowly get to temperature.
9) Check the bowl every 5 minutes until they have melted together. Ours took about 15 minutes – slightly longer than the oven took to get to temperature.
10) Remove the cookie sheet and allow the bowl to cool. You’ll see some gaps from where the beads melted in different directions but it’s fine.
11) Use a knife to help release the bead bowl from the dish.

12) Allow to cool completely then wash in soapy water to remove the residual cooking spray.
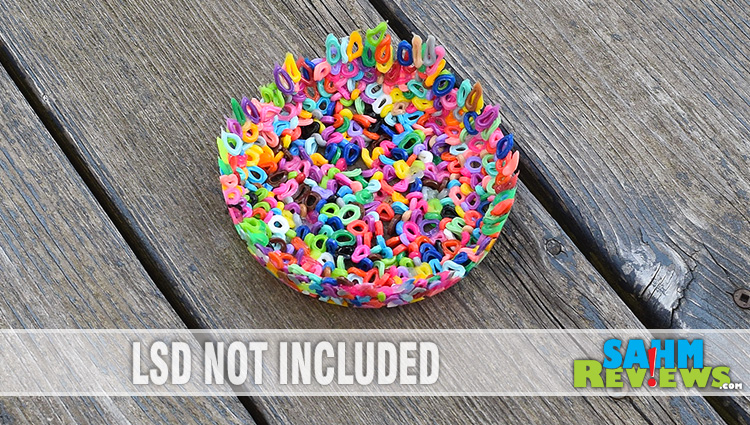
13) Admire your cool new bowl (and relish the fact that there are less unused supplies in the cabinet!)
This is a great activity for kids and it will spur their imagination on color variations and different shapes to try to create.
Have you created something like this?

That looks like a fun project using Pearler beads in a different way. I wonder if you could also put a glass dish inside the other dish to sandwich the beads between the two, then both sides would be smoother and the sides could be even taller.
My kids would get a total kick out of this!
That is so creative. My daughter would have fun making this.
Wow! What kid would not love this? I would definitely be into making color combinations and different shapes. This is VERY cool!
How fun! I just love that the kids can not only make this but use it as well!
This is pretty interesting. It probably can make a great table centerpiece or a coffee table piece
Wow, this is super neat!!
Very creative! I can see how kids would definitely love doing this. I am sure it would keep their attention for long periods of time. Thanks for sharing.
I wish I would have seen this post before I cleaned out my craft supplies. I think I got rid of some black and orange bead that would have made a great Halloween bowl.
What a great way to re use those beads. New the bowl can be used as the base for a gift-fill it up with chap stick, nail polish, ind wrapped candies etc and give to a friend (wrap it all up in colored cellophane). You could even use it on a desk to hold rubber bands, paper clips or whatever.
What a great idea. That looks like such a fun project, one that I would have liked to do myself when I was a kid. Thanks for sharing.
Thanks for sharing.. This is something my daughter would love to do and we will have to give it a shot… Awesome post…
Very cool. I love creative craft ideas that I can do with the kids.
What a fun idea! That’d be great for holding small things on an office desk!
That is so cool. My kids would totally be into making something like that. It is like a work of art.
My daughter has all those little beads in her room. This would be fun on a rainy day!
This is such a cute and simple craft that I can do with the kids. I love how colorful the finished product is.
Such a creative use of extra beads and would make a perfect catch bowl for keys or coins!
This is so fun, Nicole. My six year old would love to do this. Thank you for sharing how easy it is.
that is really cute. Would love if you came by and shared this on our kids in the kitchen linky http://lookwhatmomfound.com/2014/10/halloween-candy-coated-pretzel-rods.html
I love it! I’ll be honest, I can’t see myself making one anytime soon, but what a fun activity for the girls, made me smile!
cheers,
Gordon
I am a purger by nature and I LOVE finding uses for random leftover supplies! This is great! 🙂
This is so cool! I might have to make one. I love how colorful you can make it and it’s something you made yourself!
Wow this looks so neat! I will have to try this with my little one!!
Oh, how neat is that! Now I know exactly what to do with those extra beads we always have! 🙂
My granddaughter would love doing something like this and I know her mother would appreciate it!
What a cute, easy, and non-wasteful craft! The kids will love this!
This is such a cute idea. I used to make things as a kid with these, but I never tried a bowl.
This would great for my grands and I to do!
This bead bowl looks very nice. Thanks for sharing!
This looks creative. It turned out pretty well. Thank you for sharing.
This looks so fun. Thank you for the information.
Thats looks really cool I would like to try it
There are so many uses of beads. Thank you for sharing this one