How to Make a Diaper Bike for a Baby Shower
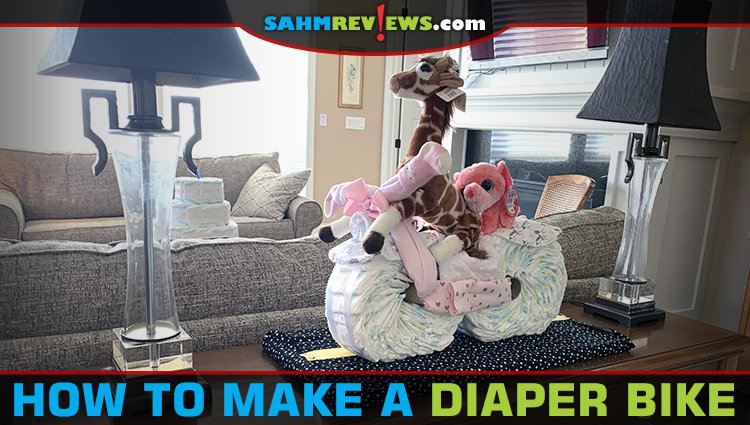
In my pre-motherhood days, I worked a lot but also had a ton of creative energy to spill into craft projects. Usually I created gift baskets or personalized, scrapbook-inspired calendars. It was a time before the internet so I don’t even recall where I came across the idea of a diaper cake or when I started making them, but it was before November 1996 because I made one for my sister-in-law’s first baby shower. I’ve made multiple since that time, keeping it simple with diapers and ribbon to make it look like a real cake. With my older brother and his wife’s announcement of their first child, Kennedy immediately knew she wanted to make a diaper bike for the baby shower. I agreed and decided to outline the details on how.

Diaper Bike Supplies
- Size 1 diapers – One large box (Qty 150+)
- Bottle – One
- Hair bow or ribbon (alternative: small rattle or teether) – One
- Newborn socks – One package
- Bib – Two
- Receiving blankets – Two (additional optional as noted in instructions)
- Burp cloth
- Teddy bear, plush or doll – One or two
- Thin white lace or ribbon – One roll
- Glue gun and glue
- Large rubber band or a long piece of scrap string or yarn
- Straight pins – Two
- Large safety pins – One or two
- Empty toilet paper rolls – Two
- Optional: Additional receiving blankets, pacifiers, hair ties, yellow construction paper
- Optional for transportation: Large photo album, keepsake/storage box, basket or baby gate
Please note that this isn’t a list of all the things you have to BUY. It’s the things you’ll USE. I’ve listed items like straight pins, safety pins, rubber bands and a glue gun which you probably have laying around the house somewhere. When it comes to shopping, there will be instances where you only need one, but will find that it’s not much more expensive to purchase a multi-pack. When costs permits, we encourage you to buy that then find ways to incorporate them or wrap them separately for the parents-to-be. Before I start the steps, I want to say that I’ve always used store brands because that’s what worked for my daughters. With respect to the major brands, my daughters either had allergic reactions, they didn’t fit well or leaked. My favorite was the Toys R Us brand, but that’s obviously not an option for you. I recommend you get size one as opposed to newborn because babies grow quickly and you’ll be gifting a lot of diapers. Would be a shame if the baby outgrew them before the parents could use them. I always use white lace or ribbon so it blends in with the diapers.
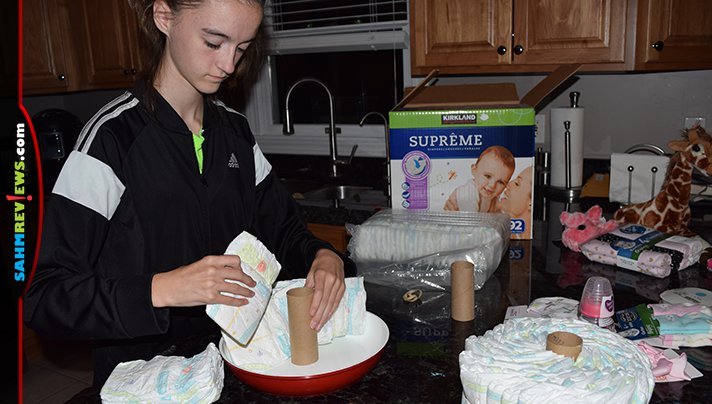
Diaper bike part: Assembling the wheels
What you’ll need: Diapers, toilet paper roll, yarn/string (or large rubber band)
When creating the cakes, I have always used a spiral method (like a cinnamon roll) because it allows more white around the edges. It’s easy to do if you have a large rubber band to hold them in place as you systematically add another layer to the outside. However, one of the quickest ways to craft a circle of diapers is to use a skillet or frying pan to help provide support to the edges. Place the toilet paper roll in the center of the pan then pinwheel the diapers (place the waist side against the center) around it until you fill up the pan. Use the string or giant rubber band to hold the diaper wheel together as you prepare for the next step.
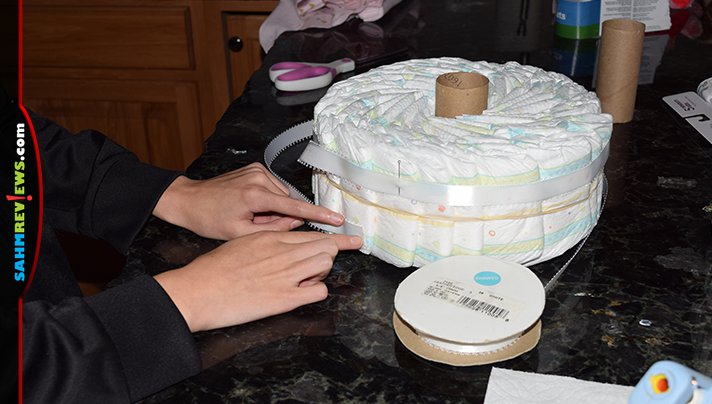
Diaper bike part: Securing the wheels
What you’ll need: Glue gun/glue, ribbon/lace, straight pins
Remove the diaper wheel from the pan. Take the roll of lace and do a rough wrap around the wheel to determine the length needed. Cut it a little long so you have some wiggle room when working with the glue gun. Use it as a template to cut a second piece. Using the straight pin about two inches from the end of the ribbon, attach directly to one of the diapers about 1/2 an inch from the bottom then wrap it completely around, adding a second straight pin about halfway around the back. This will allow you to get it lined up nicely around the entire wheel. Keeping the ribbon taut all the way around, carefully use your glue gun to secure the ribbon to the diaper. Leave the straight pins in place as you adhere the ribbon on the opposite side then finish by overlapping the beginning and end of the ribbon, adding one last squeeze of the glue gun. When you do the second ribbon about 1/2″ from the top of the wheel, be sure the glue is added to the same two diapers as the first. This is purely so you only have glue damage on two. As you begin the assembly of the second tire, leave the stick pins to relieve pressure while the glue cools and becomes secure. Repeat the entire process on the second tire. You’ll want to try to keep the size of the second wheel uniform with the first, but if one ends up larger than the other, it’s okay. The weight of them being upright when assembled will cause the shape to change a little anyhow. So…chances are the only person who will notice the tires aren’t the same size is you.
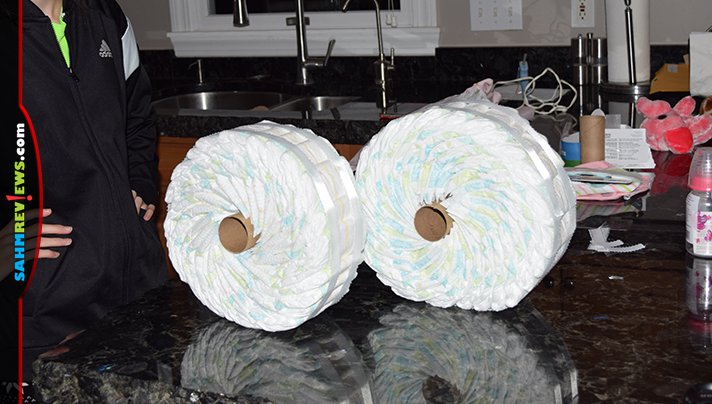
Diaper bike part: Connecting the wheels
What you’ll need: One receiving blanket, safety pin(s)
Once both the wheels are ready, it’s time to connect them. Open the receiving blanket onto the table then roll it tightly. And when I say tightly, I mean you need to be able to fit the blanket through the toilet paper rolls! Feed it through then secure the ends using one or two large safety pins. I always try to make sure the pin is on the inside of the blanket so it can’t be seen. It’s a minor detail and mostly for aesthetics. The main thing is to get the blanket through and connected back upon itself.
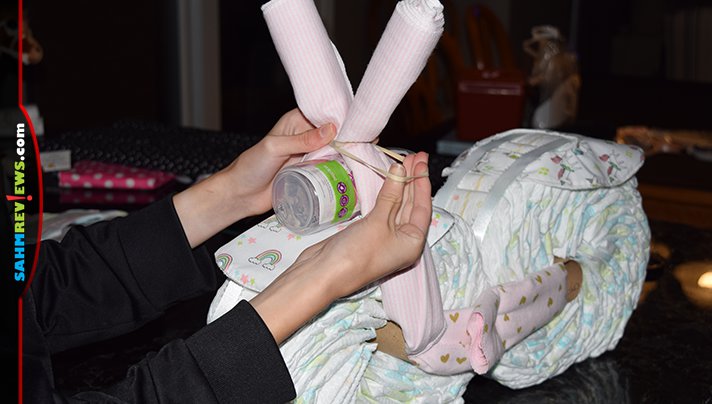
Diaper bike part: Adding handlebars, fenders, seat and a headlight
What you’ll need: Two bibs, receiving blanket, rubber band or hair tie, socks, bottle and burp rag
The bibs will become the fenders. Lay one bib across the top front of tire and carefully tuck the neck end of the bib underneath the ribbons to secure it in place. Do the same on the back wheel, too. Next, take a receiving blanket and roll it in the same way you did to connect the tires. You’ll feed this one through the toilet paper roll in the front tire then fold upward so the ends meet on either side. Place a baby bottle on top of the front tire between the handlebars with the bottom facing out to create a headlight. If you have small items like pacifiers or hair clips, you can stash them inside the bottle before putting it into place. Use a rubber band or hair bow tie to connect the two ends directly above the headlight, forming a couple inches of bunny ears above. As an alternative to the hair bow, you could attach a rattle or small toy here instead. Cap off the handlebar by creating grips using a pair of socks. You’ll put one sock on each end of the receiving blanket. Pull the bars toward the sides so they aren’t pointing straight up in the air. We decided to gently stuff some of the extra socks inside the receiving blanket to stiffen it up and help it hold it’s handlebar shape better.
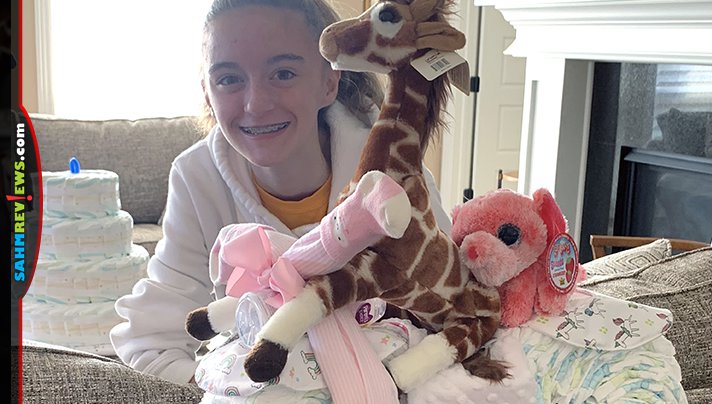
Diaper bike part: Riders and the road
What you’ll need: Teddy bear, plush or doll and optional supplies to transport it
Finally, give the bike a rider or two to finish off the look. We needed to transport the bike so we decided to wrap an extra receiving blanket around a piece of sturdy cardboard and pin strips of yellow construction paper to create a road. Not only did it give us another item as part of the gift, but it made it look polished when we carried it in. If you would like to gift some type of flat-bottom basket, storage box, scrapbook or even a baby gate, this is a unique way to dress it up.
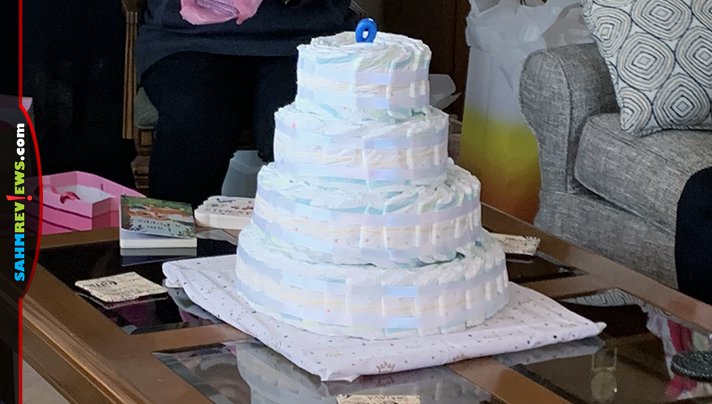
How to make a Diaper Cake
Supplies: Diapers, “0” candle, ribbon, straight pins, yarn/rubber band and a glue
gun and (optional) cardboard craft box
Chances are that you’ll have leftover diapers so plan to put them to use by making a calorie-free cake for the mom-to-be. Create different sized tiers to the cake using methods similar to those mentioned when creating the tires for the diaper bike. I always like to hide a craft box in one of the middle layers of the cake then fill it with notes, small gifts like pacifiers and board books. It’s hidden by at least one higher tier of the cake so when the guest of honor goes to disassemble the cake, it’s a fun surprise in the middle. Top off the cake with a zero candle to make it look even more real. Each tier can be transported separately and assembled at the baby shower. Consider bringing along a piece of cardboard covered with a receiving blanket to create a clean surface for display.
Both of the diaper bike and diaper cake are thoughtful gifts for the new parents. They’ll get plenty of use from the various pieces you’ve included in the gift. They will probably recognize that you dedicated a lot of your time into creating something so special for them and that’s a better gift than simply buying something off the shelf and wrapping it.
Have you ever seen a diaper bike or diaper cake like these before?
A diaper bike is cool
I never seen anything like this before but this is such a cool gift to give to someone. It’s very unique. I never thought of doing something like this before. Great idea!
Amazing! This would make a great gift for new parents. Thanks for sharing!
My boss made us a diaper cake for our shower….
Make sure to have different diaper sizes (0-1)!
I have never seen anything like this before, some good ideas.
This is one of the cleverest ideas I have seen for a baby shower. Thanks for the detailed instructions.
The diaper cake looks awesome!
Wish we would have seen this earlier. Nice gift for first time parents
This is actually my favorite first-time parent gift: http://www.sahmreviews.com/2014/02/gift-for-dad-birthday-journal.html
We started it for my husband when the girls were babies and have added to it annually since then. They’re both in college so it’s become quite the keepsake.
Pretty clever, although I like the diaper cakes better- I feel you can be more creative with them.
That is so adorable! If I ever go to a baby shower, I’ll definitely consider making this.
very cute!
Holy cow. My daughter-in-law’s shower is in January and this looks incredible.
Sara – Congratulations! These two ideas are not only functional gifts, but they’re fun. The bike takes a little more effort and items, but the cake is super easy. I use a craft box in the middle of the middle tier to include small gifts. It’s also a perfect hiding spot for sentimental items (like a baby ring), notes and gift cards.
I have seen several diaper cakes, but never a diaper bike! I love it! You’re so creative and talented! Thank you for sharing!
Thanks for the kind words, Frankie. Wish I could take credit, but I cannot. My daughter saw one online while researching baby shower ideas and wanted to make it. So we put our own spin on it and *poof*!
I love how creative this is. Thanks so much for sharing. I’ll have to try it out for the next baby shower I attend!
This is cuter than the diaper cakes. I really like this idea. Very creative.
As with anything creative, I wonder at the time tradeoff between the creative thing and more of something practical, or even just catching up on the rest of life. I think there is a place for all 3, at different stages of life.